The Main Window
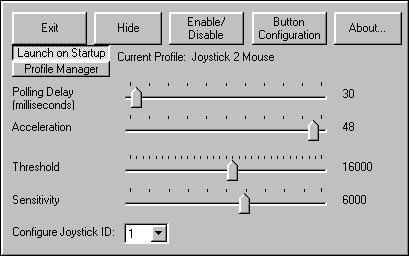
The Buttons
- The buttons let you control the program behaviour (while the sliders let you control the cursor's behaviour).
Exit
- Press this button to exit the program...
Hide
- The hide button causes the main window to disapear...
Enable/Disable
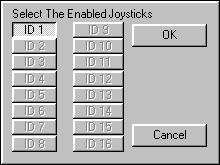
- This button pops up the "Disable/Enable" Dialog box which lets you decide which joysticks the program will use
and which joysticks it will not use. It lets you change the status of connected joysticks only.
Button Configuration
- This button opens the "Button Configuration" window.
About...
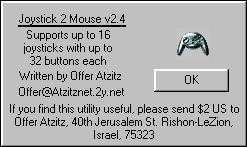
- This button opens the about window for general information about the program.
Launch on Startup
- This is a Check Box button. When this button is pressed, the program will launch automatically when windows starts, and let you use your joystick a few moments after windows finishes to load.
Profile Manager
- This button pops up the "Profile Manager Menu".
The Sliders
- The sliders let you control how the cursor react to the joystick's movement.
Polling Delay
- This slider sets the delay between two checks of the joystick's position and it's pressed/released buttons.
The smaller this value is, the smoother the cursor will move, but if this value is too small, the cursor might change it's movement speed from time to time (depends on the CPU load).
Example: If this value is 30, the program checks the joystick's status every 30 milliseconds. Acceleration
- This slider sets the cursor's acceleration.
If you move the cursor continuously, it will accelerate according to this value. The higher this value is, the faster the cursor accelerate.
Example: If this value is 0, the cursor will not accelerate (always move at the same speed). Threshold
- This slider sets the joystick's threshold.
Example: If this value is 30000, the cursor will move only when you move the joystick almost to it's limits.
The threshold is the "dead zone" of the joystick. While the joystick is in this range the program will disregard it, and consider it to be centered. The program become more sensitive to the joystick's movement as this value gets smaller.
This value shouldn't be too low or the cursor will move without control (because the joystick is never perfectly centered). Sensitivity
- This slider sets the program's sensitivity. The higher this value is, the more sensitive the program is (the cursor moves less).
"Configure Joystick ID:"
- This Combo Box tells the program what joystick to configure. That means that the changes you make, will effect the joystick that is connected
to the selected ID. It will contain only IDs on which the program detects a joystick.
It is recommended that each joystick will have a different profile, because the changes you make are also saved to the selected profile.
You can configure the joystick's ID from the windows' "Control Panel".
The Button Configuration Window
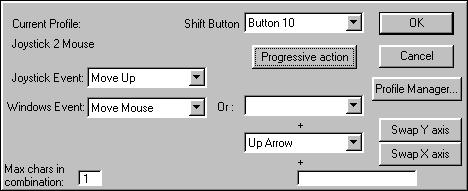
The Buttons
- The buttons in this window have general purposes.
OK
- Press this button to save the changes you've made, and close the button configuration window.
Cancel
- Press this button to close the button configuration window without saving any changes you might have done.
Profile Manager
- This button pops up the "Profile Manager Menu".
Swap Y Axis
- This button is a Check Box button. When it is pressed, the Y Axis of the joystick has an opposite effect.
This option is used usually in flight simulators that use mouse, and not joystick.
Example: If this button is pressed, when you push the joystick upwards, the program will translate it as if you pulled the joystick downwards. Swap X Axis
- This button is a Check Box button. When it is pressed, the X Axis of the joystick has an opposite effect.
Example: If this button is pressed, when you move the joystick to the left, the program will translate it as if you moved the joystick to the right. Progressive action
- This button is a Check Box button. When it is pressed, program generates a Long - Progressive command that ends when you release the button that causes it. When it is not pressed,
the program generates repeated commands (makes the command over and over again) until the button is released.
The Combo Boxes
- The Combo Boxes are used to assign a function to each button, and direction of the joystick.
Each function is built by three commands.
The first one is a combination of "ALT", "CTRL", and "SHIFT" you select from the "Select Event 1" Combo Boxes.
The second one is a mouse or keyboard command you select from the "Select Event 2" Combo Boxes.
And the last one is a text character that you write in the "Set Character" Text Boxes. The Combo Boxes and the Text Boxes are organized in two columns. The left one is the column that takes place when the Shift-Button is not pressed, and the right one is the column that takes place when the Shift-Button is pressed.
When you configure a joystick's direction you have an extra field in the first command that is "Move Mouse". If you select this option the program will move the mouse to the direction you configured, and will not do anything else.
If you don't set the joystick direction to move the mouse, you can set it as a regular button.
A good example of how to use it is:
Set each direction to move the mouse when the "Shift-Button" is not pressed, and configure it to the keyboard arrow(s) when the "Shift-Button" is pressed.
Another example: If you want to make a function of "CTRL+ALT+SHIFT+Left Click+a", you'll select "CTRL+ALT+SHIFT" on the "Select Event 1" Combo Box, "Left Click" on the "Select Event 2" Combo Box, and type "a" in the "Set Character" Text Box.Select Button
- Use this Combo Box to select a button or a direction you'd like to assign a function to it, or just see what function is currently assigned to it.
Example: If you select Button 2, you'll see in the other Combo Boxes and the Text Boxes, the commands that are currently assign to the joystick's button No. 2, change them. Select Event 1
- This Combo Boxes contains combinations of the "ALT, "CTRL", and "SHIFT" keys.
Select Event 2
- This Combo Boxes contains a list of mouse and keyboard commands.
Shift Button
- This Combo Box contains a list of all your joystick buttons, and you set the "Shift-Button" by selecting one of them.
If you select the empty line, there is no Shift-Button.
The Shift-Button does not perform any other function (the one you assigned to it by the other Combo Boxes).
Set Character
- The "Set Character" Text boxes are the last phase of building your function, it can contain any character on the keyboard.
Example: If you want to make "NullSoft's Winamp" to start playing, you can set a button that it's Combo Boxes are empty, but the Text box contains the letter "x", by doing that, each time you push this button, and "Winamp" has the focus, it will start playing. Maximum Characters in combination
- This text box sets the maximum characters that can be written in each command. You should write the characters
whitout writing anything between them.
Example: If you want to make the combination "x+y+z" you should set the "Max chars in combination" text box to 3 and write "xyz" in one of the text boxes (or both).
The Taskbar Icon
You can show or hide the "Main Window" by double clicking on this Icon. And by right clicking on this icon, you can pop-up the "Taskbar Menu"

The Taskbar Menu
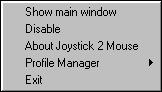
This menu contains the following commands:
Show/Hide Main Window
Disable/Enable
About Joystick 2 Mouse
Profile Manager
Exit
The Profile Manager Menu
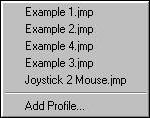
Select Profile
- You can select a profile by clicking on it's name in the "Profile Manager Menu".
Add Profile
- You select this option if you want to create a new profile.
After clicking on this option, you'll need to give your new profile a name, and click "Add" to create it, or click "Cancel" if you don't want to create a new profile.
About Joystick 2 Mouse