

The “Joystick 2 Mouse” configuration dialog box has three tabs (figure 1).
The first thing you see when you start “Joystick 2 Mouse” is
the Joysticks configuration tab divided in two parts.
The first part is the “General Configuration” part, made to control the general configuration
of the program.
You can check the “Launch On Startup” CheckBox if you want
the program to start with windows.
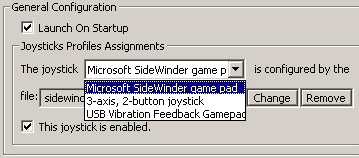
The ComboBox holds the names of the working and connected joysticks on
your system.
In this tab you select the profile that will be connected to each of these
joysticks.
- Select a joystick from the list.
- Click on the “change” button if you want to set or change the profile that will be connected to the selected joystick. Or, click the “remove” button to remove the profile that was connected to the joystick.
- Check the “This joystick is enabled” CheckBox if you want this joystick to be enabled. Or uncheck it in order to disable this joystick.
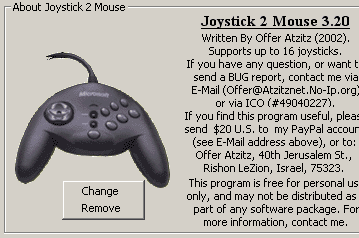
The second part is the “About Joystick 2 Mouse” part.
You can change the picture on the left so it matches the picture/s of your joystick/s.
In order to set a picture for a specific joystick, select it from the
list in the “General Configuration” section, click on the place
of the picture, and select “change” in the popup menu to select
a new or another picture, or you can remove the picture by selecting “remove”.
The second tab is the “Profiles” tab. In this tab you can
configure the “Joystick 2 Mouse” profiles on your computer.
This tab has four sections.
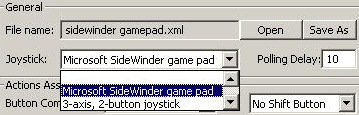
The first section is the “General” section.
In this section you select the profile you want to configure
by clicking on the “open” button.
After you’ve selected the profile you want to configure, you can
set the most appropriate joystick for this profile, or in other words,
the joystick that this profile is designed for. If you assign this profile
to a different joystick, you will get a warning. If you select the empty
line, it means that this profile is not designed for a specific joystick,
and other kinds of joysticks can use it.
In this section you can also set the Polling Delay of the joystick, when
it uses this profile.
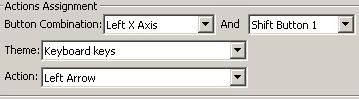
The second section is the “Actions Assignment” section. In
this section you make the connection between the joystick’s buttons,
and the actions.
In order to set an action you have to select the button you
want to configure, and a shift button. A shift button is a button that
changes the action of the joystick’s buttons. If you configure
one shift button, every other button and axis on your joystick can perform
two different actions. If you set two shift buttons, every other button
and axis on your joystick that are not shift buttons, can perform three
different actions, and each one of the shift buttons can perform an action
while the other shift button(s) are pressed, but if it is the first button
to be pressed, it does nothing, and “waits” for another button
to be pressed.
After you selected a button and a shift button, you can select the action
that will be activated. You select an action by first selecting the theme
it’s in, and then selecting the action itself.
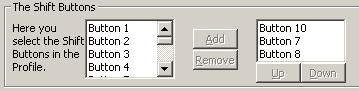
The third section is the “Shift Buttons” section. In this
section you select the shift buttons in the profile.
You can add a shift button by selecting it in the left list,
and click the “add” button.
You can remove a shift button by selecting it in the right list, and click
the “remove” button.
Because the shift buttons’ order has a meaning, you can select a
shift button from the right list, and use the “up” and “down” buttons
to change their order.
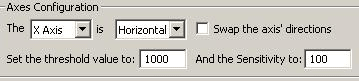
The fourth section is the “Axes Configuration” section. In
this section you can set each one of your joystick’s axes.
You can set each joystick’s type (Horizontal or Vertical), set whether
the program should swap the axis’ direction, and set the Threshold
and the Sensitivity.
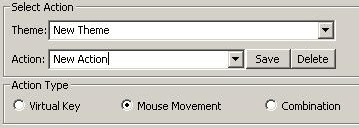
The third tab is the “Actions” tab. In this tab you manage
the actions the program will recognize and activate.
The first two sections are the “Select Action” and “Action
Type” sections.
If you select an action that already exists, you cannot
select the type of the action. To select an action, or to create a theme
that doesn’t exist, you need to write their name in the ComboBoxes,
if the name you entered exists, the action or theme with the same name
will be selected. You can select the type of the action only before you
save the action.
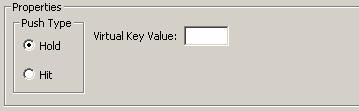
If you select a “virtual key” action (Figure 9), you’ll be able to set the value of the “virtual key”, and its “push
type”.
You can also select a “mouse movement” action (Figure 10).
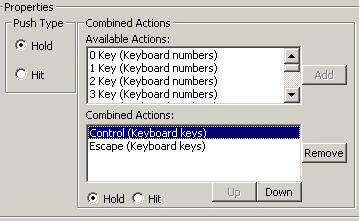
If you select a “combined” action (Figure 11), you’ll have the opportunity to select the actions that will be activated when
the current action is activated. These actions can be any one of
the known actions.